
When my husband and I bought this house, we liked that the floor plan for the main floor felt kind of open, but had enough division that each room felt like its own as well. The only thing was, we kind of felt like the kitchen could have been more opened for entertaining purposes. I love to entertain, but I don’t always love when the host manages to get stuck in the kitchen and misses out on the socialization because the kitchen is closed off.

So what was our solution?
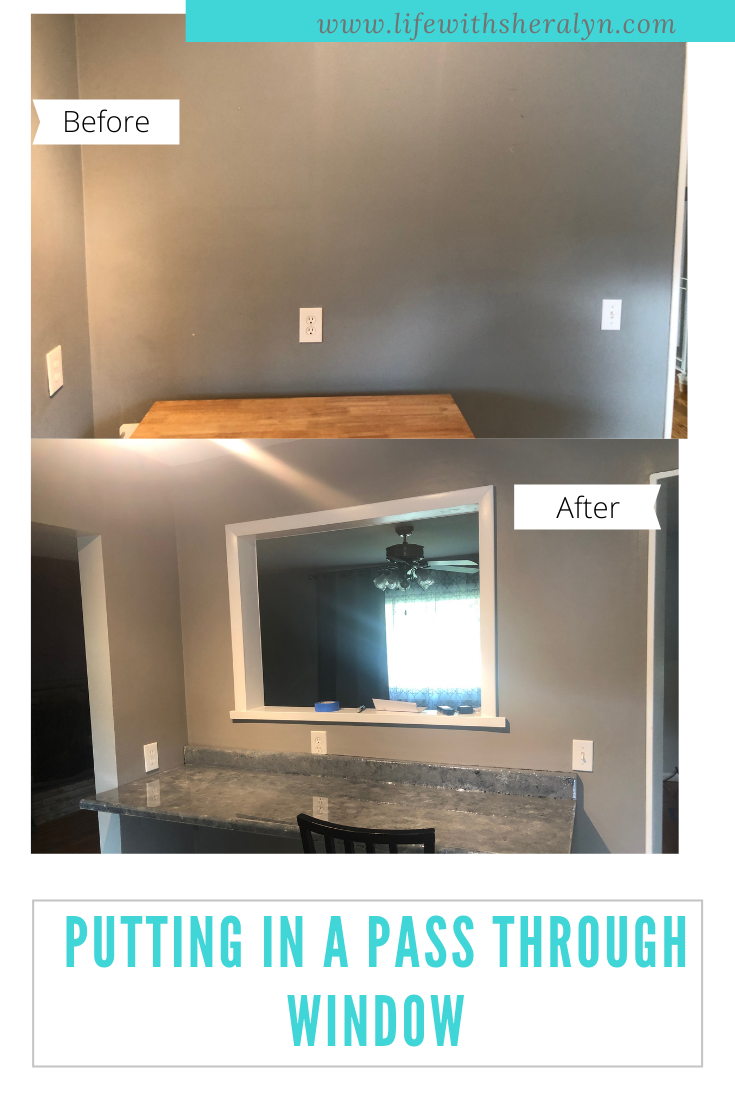
We decided that we could put a pass-through window in the wall that divided the kitchen from the living room. In addition, what’s better than more counter space?
When we bought the house, the seller left behind a rolling island type cart. It was useable, but not necessarily ideal for what we wanted. So instead we decided to put in a breakfast bar, which consisted of a floating counter under the pass-through window.

How did we do it?
To be honest, we absolutely watched an episode of “This Old House” to learn about how to properly do this. We’ve done many house projects, but we were a little nervous when dealing with walls in our brand new house. Especially since this was all new to us.
We learned that this wall we were working on was load-bearing so that posed a little bit of a complication. Not really though when we learned what we needed to do from “This Old House”. Because it was load-bearing, this post will be focused on how to put in a pass-through window in a load bearing wall.
To Start
We started by measuring the wall and deciding where exactly we wanted the hole to be. This part was actually kind of tricky because we wanted it to not be too high or too low so the sofa could sit below it. Luckily, we hit a perfect height for what we needed it to be.

Next, we used the hole cutter to make holes in the wall which would help cut the drywall. It gave us some insight into what was behind that drywall in case there were unexpected things hiding. Mostly, we were looking for pipes, gas lines, electric, etc.
Luckily, we didn’t find anything too concerning. We did find some electrical, but we decided that it was something we would be able to re-route once we cut the drywall.

After cutting the drywall away, we had 2 studs running through the space we were wanting to cut. The only issue we had was that the next stud left within the wall was further away on one side than the other, but we were able to compensate for that. If we did it again, we would probably try to cut even more evenly in the middle between the studs.
Hold the Wall up
Because we were dealing with a load bearing wall, the next thing we had to do before cutting into the studs was prop up the wall with a temporary hold. We learned this on “This Old House”.
We took long 2x4s and lodged them between the ceiling and floor in the kitchen so we could keep working on the living room side without obstruction, but this way the ceiling was supported while we worked on cutting the studs before adding in a header.

Finish the cut
Once the ceiling was supported, we were able to finish cutting the drywall on both sides and cut the studs in the middle.
Since we had a load bearing wall to support, we decided to put in a header so it could be safe.
In order to finish out the window, we put new 2x4s into the space as a frame that attached to the studs that were still there and put the heading in, which got attached to the joists in the attic.

Drywall. All. The. Drywall.
In order to take the now functioning pass through window and make it aesthetically pleasing, we had to start drywalling and painting.
We first took some sheet rock cut into pieces and added them over the header and to anywhere else we cut into the wall. We had to cut into extra places because we wanted to reroute some wiring that was in the wall.

Next it was time to do a lot of spackling! We spackled over the sheet rock and smoothed out all the dry wall on both sides for as seamless a finish as we could get. We also put mesh and drywall over the 2x4s to fill in the gaps on the walls. Once the drywall was dry, we needed to sand it down so it was super smooth. Then we needed to reapply drywall putty to some areas, and of course sand again. Pro tip – get yourself a drywall sander with an ability to attach it to a shop vac. This will help prevent the tons of drywall dust that is inevitably coming.


We, of course, did all of this before painting so once it was dry, we could paint the whole wall for a more seamless finish.
Finishing Touches
To make the inner part of the window look more finished, we put some thin pre-painted boards over the drywall and screwed them into the 2x4s we had added to the existing studs.

After we added those pieces, the wall was almost finished. Next we had to add some paint. We painted the inner pre-painted with extra white and painted the walls.

After that we added trim around the window on both sides to really give it a more finished look.
Finally we added caulk to all the seams and painted the trim white for an extra finished look.


Having the pass through window between the two rooms makes such a huge difference! It has upgraded the quality the living in our home and I just love how it looks.
I hope this brings you encouragement that you can do this to your home too and helps you in making it happen!
No responses yet